Introduction to the SMART Student Biological Microscope
Microscopy opens a whole new world of discovery for students, but many affordable microscopes fall short in durability, image quality, or usability. Teachers and homeschooling families often struggle to find a Student Biological Microscope that balances affordability, features, and ease of use. The SMART Student Biological Microscope is a next-generation option designed for classrooms and home labs, combining traditional optical performance with digital connectivity and smart features. In this post, we explore why the SMART model is ideal for educators, how it improves STEM learning, and practical ways to integrate it into science lessons.
By the end, you’ll understand why the SMART Student Biological Microscope stands out compared to other budget-friendly student microscopes.
1. What Makes a SMART Student Biological Microscope “Smart”
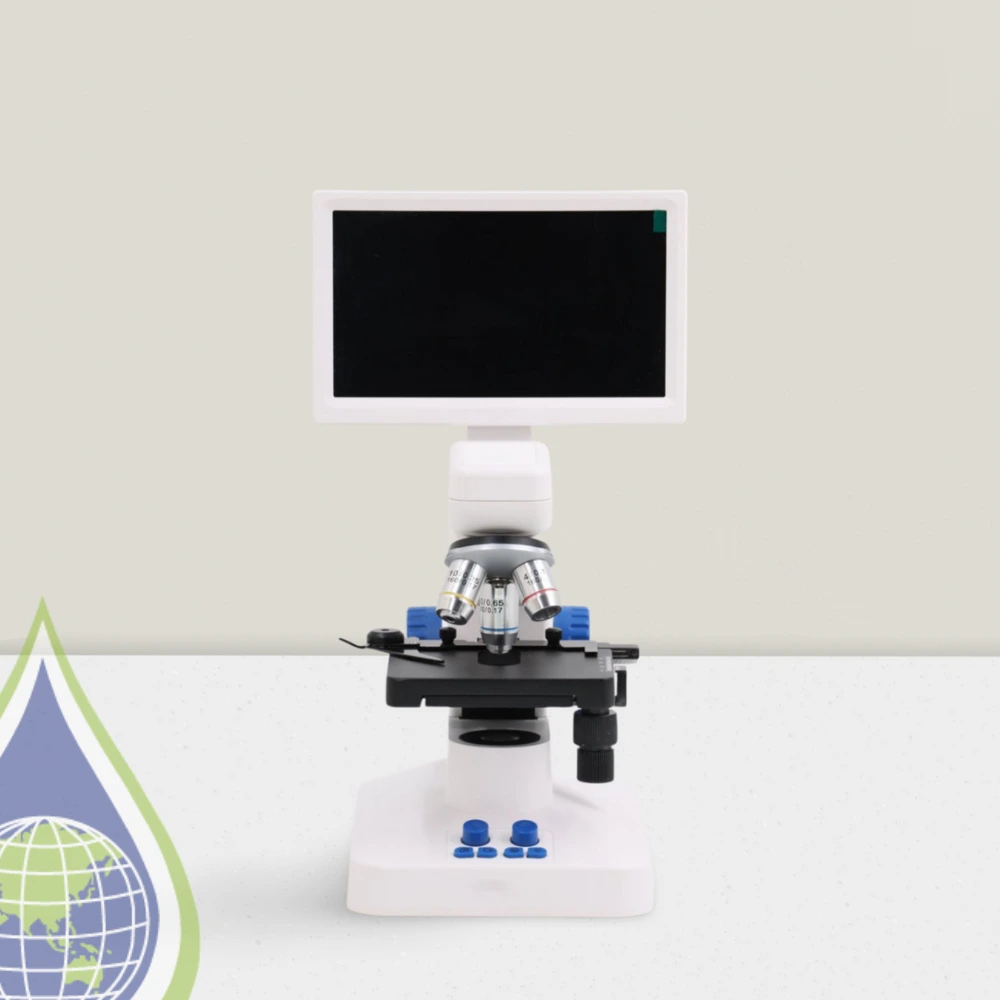
To many, a “smart microscope” sounds like something out of a futuristic lab, but the SMART Student Biological Microscope is a tangible, practical example designed specifically for classrooms and home labs. Unlike traditional student microscopes that require manual focusing and separate cameras or adapters for digital capture, this microscope comes fully integrated with a high-resolution built-in camera, WiFi connectivity, and intuitive software that allows teachers and students to capture, store, and share images and videos of their specimens with ease. These features make the SMART Student Biological Microscope ideal for modern STEM classrooms, where interactive learning and collaborative observation are essential.
In practical classroom settings, the digital features of the SMART Student Biological Microscope allow multiple students to view slides simultaneously on tablets, computers, or large monitors, removing the bottleneck of crowding around a single eyepiece. Teachers can project live images during lessons, annotate directly on the screen, and even save images for later analysis or homework assignments. The auto or assisted focusing feature reduces frustration for younger learners, helping students quickly achieve sharp, clear images without wasting valuable class time. This also means educators can spend more time teaching science concepts and less time troubleshooting microscopes, making lessons smoother and more productive.
Beyond just convenience, the SMART Student Biological Microscope enhances engagement and curiosity. Students can experiment with live microorganisms, plant cells, or prepared slides while immediately seeing the results of their work digitally, which reinforces learning and retention. The software allows measurements, annotations, and comparisons over time, encouraging critical thinking and hands-on investigation. Teachers can integrate the microscope into diverse STEM lessons, from biology to environmental science, making it versatile for different grade levels. Importantly, all of these smart features are integrated without compromising the microscope’s core optical quality; students still get crisp, accurate, high-magnification views of their specimens, while also benefiting from modern digital enhancements.
In short, the SMART Student Biological Microscope transforms traditional microscopy into an interactive, engaging, and student-centered experience. It bridges the gap between classic optical education and modern digital learning, enabling educators to save time, increase student participation, and foster curiosity and critical thinking — all within a single, durable, and easy-to-use microscope built for today’s classrooms and homeschool environments.
1. What Makes a SMART Student Biological Microscope “Smart”
Many student microscopes on the market lack built-in digital features or durability. The SMART Student Biological Microscope stands out because it combines:
-
Digital integration – built-in camera and WiFi for group viewing
-
Ease of use – auto/assisted focus saves time in classroom settings
-
High-quality construction – durable metal frame and spring-loaded objectives
-
Teacher-focused tools – software for image measurement and annotation
-
Reliable support – local servicing and warranty coverage
| Model | Magnification | Digital / Camera | Ease of Use | Price Tier | Suitable for Class/Home |
|---|---|---|---|---|---|
| SMART Student Biological Microscope | 40–1000× | Yes | Medium / assisted | Mid |  |
| AmScope Student Compound | 40–1000× | Usually no | Manual | Low/Medium | |
| OMAX Student Microscope | 40–1000× | Some have camera ports | Manual | Medium | |
The SMART Student Biological Microscope offers more seamless integration into classrooms and home-school environments compared to typical budget options
View our unboxing of the sMART student biological Microscope
4. How to Use the SMART Student Biological Microscope in Lessons
4.1 Getting Started with the SMART Student Biological Microscope
Setting up your SMART Student Biological Microscope is quick and simple, even for first-time users. In just a few minutes, you can have your microscope ready for hands-on learning:
Unpack the microscope kit – carefully remove the microscope, prepared slides, and accessories from the box. Align the objectives and ensure the eyepiece is clean for optimal clarity.
Connect digitally – link your microscope to a tablet, computer, or monitor using WiFi, HDMI, or USB. This allows you to project live images for group viewing, capture images for later analysis, or share observations remotely with students.
Load prepared slides – your kit comes with a variety of slides specifically chosen to introduce students to different biological structures and microorganisms. Secure the slide on the stage with the stage clips, adjust illumination using the built-in LED, and bring the image into focus with coarse and fine adjustment knobs.
Adjust lighting and focus – experiment with different LED intensities and condenser positions to optimize contrast and clarity. The auto or assisted focusing helps younger students quickly achieve sharp images without frustration.
By following these simple steps, your Student Biological Microscope is ready to provide a smooth and engaging STEM experience from day one.
4.2 Sample Lessons & Experiments Using Prepared Slides
The SMART Student Biological Microscope comes with a selection of prepared slides designed to introduce a range of biological concepts. Here’s how you can use each slide type in lessons and experiments:
Plant Cells – Onion Epidermis, Elodea, and Leaf Cross-Sections
Observation: Examine cell walls, nuclei, and chloroplasts.
Experiment: Compare stained vs. unstained cells using methylene blue or iodine. Students can measure cell size, count chloroplasts, or observe differences between plant species.
STEM connection: Learn about photosynthesis, cell structure, and plant physiology.
Pond Water Microorganisms
Observation: View live protozoa, algae, and microorganisms swimming in natural water samples.
Experiment: Compare samples from different water sources, observe movement patterns, or track microorganism populations over time.
STEM connection: Study ecology, microorganism behavior, and ecosystems.
Insect Wing Cross-Sections
Observation: Examine vein patterns, scale structures, and chitin details.
Experiment: Compare different insect species or observe symmetry and patterns in biological structures.
STEM connection: Explore taxonomy, anatomy, and structural adaptation.
Human/Animal Cells (Prepared Blood or Cheek Cells)
Observation: Identify cell membranes, nuclei, and other organelles.
Experiment: Use simple staining techniques to highlight nuclei or observe differences between cell types.
STEM connection: Understand cell biology, genetics, and human anatomy.
Fungi and Moss Slides
Observation: Identify hyphae, spores, and plant-like structures in moss.
Experiment: Compare growth stages or measure spore sizes.
STEM connection: Introduces mycology, plant biology, and life cycles.
Each slide encourages students to ask questions, take snapshots, annotate images digitally, and compare findings with peers, making the Student Biological Microscope ideal for interactive learning.
4.3 Classroom and Homeschool Tips
To maximize learning with your SMART Student Biological Microscope, consider these practical tips:
Pre-focus slides before lessons to save class time.
Project digital images on a screen so the whole class can observe structures simultaneously.
Encourage snapshot-taking and annotations using the microscope’s software, helping students document their observations and track experiments over time.
Rotate slides among students to ensure everyone has hands-on experience without crowding around the microscope.
Use optional accessories such as extra slides, lens cleaning kits, or prepared kits for advanced experiments.
These strategies help teachers and homeschoolers integrate microscopy into a wide range of STEM lessons effectively.
4.4 Maintenance and Care
Proper maintenance ensures your Student Biological Microscope remains durable and reliable:
Clean lenses gently with lens tissue or optical cleaner to prevent scratches.
Replace LED bulbs or batteries as needed for consistent illumination.
Store the microscope in its protective case to prevent dust or accidental damage.
Periodically check and adjust stage clips, objectives, and focus knobs to ensure optimal performance.
5. SMART Student Biological Microscope: Lesson Plan Guide
Lesson 1: Observing Plant Cells – Onion Epidermis and Elodea
Objective:
Students will learn to identify plant cell structures, including cell walls, nuclei, and chloroplasts, and understand differences between stained and unstained cells.
Materials:
SMART Student Biological Microscope
Prepared slides: onion epidermis, Elodea leaf
Methylene blue or iodine stain
Lens tissue, notebook, tablet/computer for image capture
Instructions:
Set up the Student Biological Microscope and connect it to a tablet or monitor.
Place the onion epidermis slide on the stage. Adjust illumination and focus.
Observe cell walls, cytoplasm, and nuclei.
Optionally, apply methylene blue or iodine to enhance visibility of the nuclei.
Capture digital images and annotate structures using the microscope software.
Repeat steps with the Elodea leaf slide, observing chloroplast movement.
Discussion Questions:
What differences do you notice between onion and Elodea cells?
How do the cell structures relate to their function?
Why does staining help in observing certain structures?
STEM Extension:
Measure the size of cells using the digital measurement tools.
Track chloroplast movement over time under the microscope.
Lesson 2: Studying Pond Water Microorganisms
Objective:
Students will explore microscopic life in pond water, identifying protozoa, algae, and microorganisms.
Materials:
SMART Student Biological Microscope
Prepared pond water slides or fresh pond samples
Notebook, tablet/computer for image capture
Instructions:
Place the pond water slide on the stage and focus using the SMART Student Biological Microscope.
Observe swimming protozoa, algae, and other microorganisms.
Capture images and videos to document observations.
Record movement patterns, shapes, and relative sizes.
Discussion Questions:
How do the shapes and movement patterns of microorganisms differ?
What adaptations help these organisms survive in water?
How does the biodiversity in pond water relate to a healthy ecosystem?
STEM Extension:
Compare samples from different ponds or water sources.
Count and classify microorganisms, creating a simple data chart.
Lesson 3: Insect Wing Cross-Sections
Objective:
Students will examine insect anatomy, focusing on vein patterns and structural adaptations in wings.
Materials:
SMART Student Biological Microscope
Prepared insect wing slides
Notebook, tablet/computer for digital capture
Instructions:
Place the insect wing slide on the microscope stage.
Adjust lighting and focus to observe wing veins and scale structures.
Capture images and annotate vein patterns.
Compare wings from different insects to study variation.
Discussion Questions:
How do vein patterns differ between species?
What role do wing structures play in flight?
Can you identify symmetry or repeating patterns in the wings?
STEM Extension:
Draw diagrams of observed wing patterns.
Research how structural adaptations contribute to survival and flight efficiency.
Lesson 4: Human or Animal Cells (Cheek or Blood Cells)
Objective:
Students will identify basic human or animal cell structures and understand their functions.
Materials:
SMART Student Biological Microscope
Prepared human cheek cell or blood slides
Methylene blue stain (for cheek cells)
Lens tissue, tablet/computer for image capture
Instructions:
Place the prepared slide on the stage and focus using the microscope.
Observe cell membranes, cytoplasm, and nuclei.
Apply stain if necessary to enhance visibility.
Capture images digitally and annotate each part of the cell.
Discussion Questions:
What differences can you see between animal and plant cells?
How does staining help identify specific cell parts?
Why is it important to observe live or well-preserved cells for biology studies?
STEM Extension:
Compare cell sizes from different samples.
Research the function of each organelle and discuss in small groups.
Lesson 5: Fungi and Moss Slides
Objective:
Students will explore plant-like organisms, identifying hyphae, spores, and moss structures.
Materials:
SMART Student Biological Microscope
Prepared fungi and moss slides
Tablet/computer for digital capture
Instructions:
Place the fungi or moss slide on the microscope stage.
Focus and adjust illumination to observe spores, hyphae, and leaf-like structures.
Capture images for comparison.
Record observations in a notebook, noting size, shape, and arrangement.
Discussion Questions:
What structural features help fungi and moss survive in their environments?
How do spores contribute to reproduction?
Can you identify similarities and differences between moss and higher plants?
STEM Extension:
Track spore growth over multiple days.
Compare moss leaf structures to those of a plant cell observed earlier.
Tips for Integrating the Lesson Plan
Rotate slides so every student has hands-on experience with different specimens.
Use the microscope’s digital projection for group discussions or demonstration before independent exploration.
Encourage students to take notes and annotate images using the software.
Supplement with worksheets or quizzes to reinforce observation skills and concepts.
Link lessons to broader STEM topics, like ecosystems, cell biology, or anatomy, for cross-curricular learning.

6. Frequently Asked Questions About the SMART Student Biological Microscope
Q1: Is the SMART Student Biological Microscope affordable for teachers?
Yes — it bundles optical hardware, digital capture, and software in one unit for classroom and homeschool budgets.
Q2: Can it be used in both classrooms and homeschooling?
Absolutely — connectivity features allow small groups or one-on-one lessons to view slides simultaneously.
Q3: What magnification does it support?
The SMART Student Biological Microscope supports 4×, 10×, and 40× objectives for a total range of 40–400× (or up to 1000× depending on model).
Q4: Do I need a separate camera?
No — digital imaging is built-in with HDMI, USB, and WiFi connectivity.
Q5: What warranty and support are included?
Includes a 12-month warranty, local support, and spare parts availability.
Q6: Can it be used for advanced student science projects?
Yes — optical quality, camera, and software features make it suitable for advanced STEM experiments.
Q7: Do you have other blogs or references for me to read?
We sure do, click the links below for more information.
SMART Student Microscope for Schools and Kids in Australia
Top 5 Microscope Experiments for Students Using the SMART Student Biological Microscope
Algal Bloom Testing Adelaide and Australia
The SMART Microscope: Your Educational and Immersive Microscope
http://zeiss.com/microscopy/en/resources/insights-hub/teaching/microscopy-and-stem-education-fostering-scientific-curiosity-in-young-minds.html
https://foldscope.com/blogs/blog/why-are-microscopes-important-for-student-engagement?srsltid=AfmBOooxg6aAFeiQbnlo_ytqcZ7cI3jg0pqg6wscpiIYJeDLyms-EQoP
STEM Activities Using Microscopes